|
|
 |
| The original |
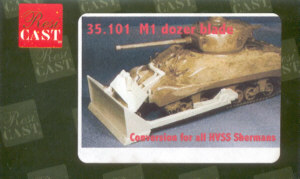
From old make new - that could be the motto of this article. Not a real construction review this time, just a conversion. Some readers might know my old Sherman in the US Army livery from our Reader's gallery - following I will describe how it changed from a early version US M4 Sherman into a british Sherman I with M1 dozerblade.
Dozer were
an integral part of allied landing operations, though in the beginning
only armoured - and somertimes even unarmoured - Caterpillar dozers were
employed. Their task was to clean the beaches for the following troops
during amphibious assaults. Certainly not a nice job when sitting in a
lightly armoured and unarmed vehicle.
As a supliment to these vulnarable vehicles, the US forces developed a
fully combat-capable tank with M1 dozerblade. The M1 blade was herefore
fit to the medium tank M4 Sherman and could be used by all M4 variants
up to the M4A4 (Sherman V). "Sherdozers" were mainly used by the US Army,
but several exapmles also found their way into british service.
| The model |
My Sherman dozer was to resemble a vehicle of the british Guards Division, which was part of british XXX. Corps advancing on the Maas-, Waal- and Rhinebridges of Eindhoven, Nijmegen and Arnheim as part of Operation "Market Garden" in septmeber 1944. I intended to use Tamiya's older M4A3 as a base kit for the conversion, but during my recherches for my Market Garden diorama, I found out that the British used dozers based on Sherman I, III and V. So my Sherman IV was out of the race and I had to look out for an alternative. I still have a good quantity of DML's M4A4 - thus a Sherman V - but these are already reserved for other conversions. The only possible basekit left was therefore Tamiya's early version M4.
My old Sherman - my first "new age" 1/35th kit - wasn't really up to my standards anymore, and as converting is far cheaper than building a complete new kit, I chose it a my "victim". The Dozer conversion kit is from Resicast of Belgium (available at Mako-Modellbau) and the quality is very excellent!
| The construction |
First of all
my Sherman had to be stripped. This means I had to remove all the attached
accessory parts, tracks, figures and most important the decals. For removing
the decals I followed a hit from one of our forum mebers and used warm water and soap. The decals didn't really go off the model, instead the
more than 6 years old colour started to desolve. A nice sideeffect, as
this way some of my former misshaps could easily be removed. Only my old
comouflage net was glued in such I way, I had to keep it.
The resinparts of the conversion kit could be removed from the sprues easily and needed only minimal sanding. Only one part - the fronthull bracket - was molded in such a way, that it broke into three pieces when trying to remove it from the runner. But this wasn't a real problem, as the parts could be glued into place with no sweat.
I started
with the dozer fixation which is attached to the tanks running gear. The
only harder part here was to fit the 2 x 4 nuts which is a little tricky.
Who doesn't dare using the resin nuts can still switch to plastik nuts
which are easier to handle though.
I continued with the front assembly. Here one has to consider, that the
right light and the hull machine gun have to removed, as the fairing for
the electrical dozer  control
have to be fit in this plase. The fairing has to be cut to length according
to the used model.
The Resicast parts fit very well and can be attached to Tamiya's early version Sherman without any problems. The more remarkable as the conversion kit wasn't really inteded for this kit. Finally one can assemble the dozerblade itself. The instruction sheet is a little confusing in the beginning, but problems depart as soon as dryfitting starts.
All in all the assembly of the dozer parts did not take more than half a hour. That way resin is real fun!!
| Painting |
 Tamiya
proposes a mixture of black, deep-green and flat earth (mixed at a ratio
of 1:4:4) as the base colour for british vehicles. Instead I followed
the example of my modelling friend Werner Kampfhofer, who primes his models
with black colour. This way I could take my black part of the colour from
the primer and a later washing.
The black basecoat also has the advantage that the dark colour still shines
through on the edges - a great help for later depiction of light and shadow.
After the priming the whole model was sprayed with a 50:50 mixture of
deep-green and flat earth. The basecoat still has to show through a littlebit.
After a short phase of drying, a third lighter coat of sprayed to the
model. I mixed about a third of Khaki (Tamiya XF-49) to base coat - using
this mixture as my highlighting colour.
In the next
step I went for the tracks. The vehicle is equipped with rubber chevron
type tracks, so I was thinking hard of how to show the effect of used
rubber on the model. Well, it's easier than I thought - no need of drybrushing
or the like. As the model has a ggod old vinyl track, it is enough to
simply sand the chevrons. Later on the track was weathered with a mixture
brown and black pastell chalks. The endconnectors were treated with Scale-Line's
two component rust.
 The
dozerbalde itself received a basecoat of polishable steel from Model Master
and was then treated with rust and earth (fine car putty). The earth was
again coloured with pastells.
The most
demanding - not to say the most exiting - part of the painting was the
application of the numerous markings. My Sherdozer should represent a
vehicle of the armoured brigade workshop - the REME (Royal Engineers -
Mechanical and Electrical) of the Guards armoured division. He thus carries
the divisional marking ("The ever open eye"), the arm of service mark,
a bridging classification, the WD number, the air recognition star and
last not least a vehicle name. All markings were applied by the means
of Eduard Express Masks and airbrush. As this might still be fun when
working on flat and even surfaces and gives you quite an amount of adrenaline,
when working on bend areas like the front fenders. This is especially
true for the arm of service sign - the white "99" on an blue/yellow/red
table. Eduard does not have a stencil for this, so I had to cut it from
several others. That makes six layers (!) of colour for a single marking
- hard to describe what you feel when removing the final mask…
 The
serial number in the rear of the vehicle as well as the tanks name "Knappogue
Castle" (name of a tasteful Irish Whiskey by the way) wre also applied
using stencils. Every single letter and number is a single stencil! I
used Eduards "US Army Register" for these.
When finished
with the markings, the Sherman received a light wash of black and burnt
sienna (ratio approx. 5:2) and thereafter was drybrushed with a light
khaki/mint tone.
Finally I sprayed a thin layer of dust to the lower portion of the hull
and running gear, consisting of 2:1 mixture of Tamiya's buff and flat
earth colours.
The tank commander is taken from Tamiya's Cromwell kit, whereas the driver is from Tamiya's Daimler scout car. Both heads are from Hornet.
| Resumee |
There is only one negative point I can mention about the Resicast conversion kit - the front hull bracket. I did not succeed to clean it from the sprue without breaking it, however this was my first resin experience. Especially from this experience I can really propose this conversion kit also to resin beginners. You don't only get a very attractive model, which is suited for dioramas very well, but you also receive a kit that helps beginners carefully enter the world of resin. Speaking for myself, I am really looking forward to my next Resicast conversion kit - the Sherman Crab…
| Price / value: | ***** | Part's fit : | ***** |
| Details: | ***** | Skill: | ***** |

|

|

|
|
 |
 |
 |


© 11/2001
Carsten Gurk


