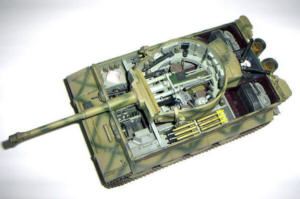
|
with interior |
 |
| The kit |
I guess I
need't say much about the original Tiger, so we get straight to the model.
I would like to answer one of the most frewuent questions right away:
No - it is not the Tamiya model!
Academy's Tiger with interior comes with no less than 15 sprues plus an
additional two sprues for polycaps and vinyl tubes. Those who think about
buying photoetched engine grills can save their money - they are of course
included as well!
The parts divide into 8 sprues for the earyl Tiger itself, 5 sprues for
the complete interior and another 3 for the very good single-link tracks.
All parts are moulded very well, quality is on a very high level. The
price is at about 45-50 Euro, thus approximately the same level as a comparable
Tamiya Tiger without (!) interior.
The fine printed decals offer the opportunity to choose between five vehilces
, amongst them the famous Wittmann Tiger.

| Der Bau |
 The
first 3 of the total 28 construction steps contain the Tiger's running
gear. As I paint the running wheels while they are still on the sprues,
I only attached teh supension arms at this stage. Their fitting is very
well, all arms touch the ground with complicated alignment.
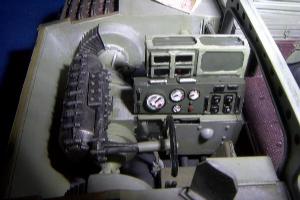
After finishing the vehicle's rear section - both versions of the Feiffel air filters are included - we move on to the hull's interior in the next six steps. We start with the nicely detailed Maybach engine and Olva transmission unit. A bit of attention is needed before painting the instruments, as Academy's color recommendatiosn seam to be wrong - at least to my knowledge. The instruments should have white cifers on black ground and not vice versa as in the construction manual. As we are dealing with color miracles we can directly move on to the recommended interior color. Academy proposes a mixture of 9 parts white and 1 part green. More probable should be a light beige tone as can be seen on respective paintings. However, I can not proof that the greentone is definitely wrong.
 After
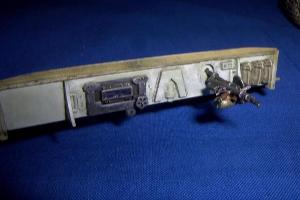
completion of the engine compartment, batteries, driver- and radiooperator's
seat, control elements and ammo magazines find theri way into the hull.
Same is valid for the engine-transmission assembly, which fits nicley
and without any problems.
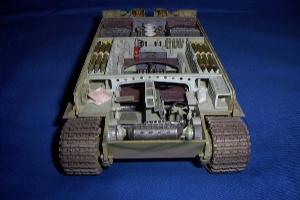
In general we can say that the complete hull area fits very well and is
a real pleasure to build. However there are some small points of crticism
as well. For instance only the top layer of ammunition in the side magazines
is displayed, all layers would have been better. Academy seems to know
this criticism and have reacted, as the later kits as Achilles and M-10
display their whole ammo stocks.
Real problems came up with the exact placement of the fueltank/radiator
units and the transmission. The fueltanks position is not given precisely
in the manual, so I aligned them by eye. Everything looked nice and stood
in a rectangle... only the upper hull would not fit anymore... A bit more
precise drawings in the manual would have been extremely helpfull. Same
is valid for the steeringtransmission in the Tiger's front. Again fitted
by eye measurement. 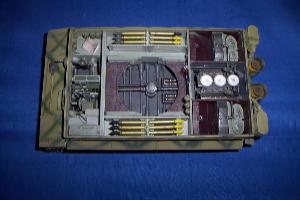 Here
the glacis plate did not fit in correctly anymore. As teh transmission
was glued in allready, I simply had to sand off some nuts. Well - some
early dryfitting would have helped prevent this problem, so I can't realyy
blame Academy for this.
But on with the points of criticism. To be honest there is only one part
that really catches my attention - they ammostorage next to the driver.
I wonder how granates should be placed in here, it is simply way to short.
After finishing the lower hull, we move on to the upper hull. Academy provides several variation possibilties, you can open the engine deck and/or the radiotor compartments seperately - nice opportunities for diorama builders. There is not much more to be said aout this stage besides: "Fits!"
In step 19
we start with the construction of the turret, or better it's interior.
Looking at original drawings shows the turrets interior is resembled completely.
I could not avoide some problems however. Obviously Academy run out of
space for parts F10, F11 and F13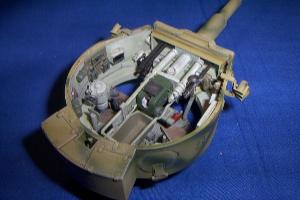 . The overview drawing shows the correct offset placement, but in steps
20 and 21 we are supposed to align them vertically under each other. If
you want to go for the correct offset alignment, you'll run out of space
for the power distributor. For the rest of the parts the same is valid
as allready said about quality and details, strictly great. The main gun
and remaining components are resembled very good. A major problem came
up when fitting the turrets roof. Quite some sanding was needed to make
it fit on the turret.
The roof is not the only thing that would not fit on my turret. The turret could not be persuaded to turn into the 12 or 6 o'clock positions. Reason ? The small noses designed to keep the turret on the hull could not pass the side ammo-storages. A simple cut with the hobby knife could solve this problem quickly.
I would like
to point out one thing - the mentioned problems do not reduce the kit's
overall high quality! All prblems can be solved easily (roof, turretring)
or could have been prevented by thorough dryfitting (fueltanks, transmission).
| Painting |
As mentioned above, Academy offers the chioce between five vehicles in
four cammo schemes. Two vehicles of the 2nd SS Panzer Division "Das
Reich" during the battle of Kursk in a three color scheme, a grey
"Leningradtiger" of schwere Panzer Abteilung 502,
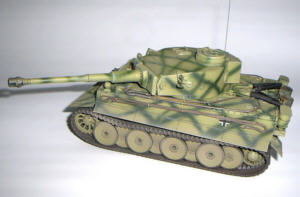 a
Tiger of the 504th belonging to the Afrika Korps, as well as the probabyl
most famous earyl Tiger - Michael Wittmann's Tiger, thus in winter white
wash. At least the latter does not really convince me, as the markings
and painting instructions are in doubt. The vehilce is named "S03"
by Academy, in reality it was the "S04" - that the turretnumber
was not red doesn't matter anymore... Moreover the colors black and white
of the kill rings on the barrel seem to have been swapped. The decal sheet
from Tamyia's early Tiger looks more realistic here.
a
Tiger of the 504th belonging to the Afrika Korps, as well as the probabyl
most famous earyl Tiger - Michael Wittmann's Tiger, thus in winter white
wash. At least the latter does not really convince me, as the markings
and painting instructions are in doubt. The vehilce is named "S03"
by Academy, in reality it was the "S04" - that the turretnumber
was not red doesn't matter anymore... Moreover the colors black and white
of the kill rings on the barrel seem to have been swapped. The decal sheet
from Tamyia's early Tiger looks more realistic here.
More important than this should be the high quality of the decals, which
is excellent, and that we have this choice of decals at all. At a time
when most manufacturers only include some Balkenkreuze this is not the
rule.
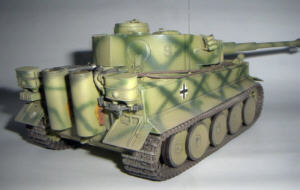 For
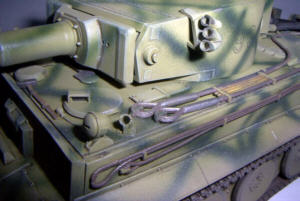
my Tiger I chose a panitscheme from the Ledwoch Tiger book - narrow green
stripes on dark yellow ground. The vehicle is said to be part of 3rd SS
Panzer Division "Totenkopf" and does not carry any further markings.
As this seemed a bit too boring to me, I added Balkenkreuze and turretnumbers.
Before putting your airbrush into action, you should carefully seal all
the upperholes openings and holes - otherwise you will finde your camouflage
on the radiators, the granates and other "nice" places.
The model
was primed with black airbrushcolor from Revell, which had to dry for
half a day. After the color was set, the basecolor followed. I used Tamiya's
XF-60 Darkyellow, which was thinned at a 1:1 ration. I sprayed it carefully,
as I wanted the black primer ti shine through at the edges. Now it was
time for a longer session - the cammo stripes. How nice were the times,
when I applied such stripes by normal brush... In two hours filled with
adrenaline I tried to copy the scheme with my Aztek from the drawing.
The green I used consists of 7 parts Tamiya Japanes Army Green and 3 parts
Deep Green.
 Before
we get to the Tiger's wheathering, the markings have to be applied. I
used Archer Dry Transfers for the Balkenkreuze, turretnumbers and divisional
sign - the skull - were applied using stencils from Real. 3rd SS. Pz.
Div. really used "900" turretnumbers by the way.
This time
my Tiger should not catch attention by it's painting, but by his interior.
I therefore only applied a light washing mixed from ivory black, burnt
umbra and burnt sienna, which was applied to the whole vehicle. Subsequently
I did a detail washing with a less thinned mixture. 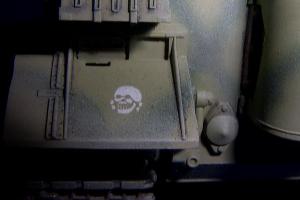 After the model was dry, a again only slight drybrushing followed, using
a light green tone mixed from artists oil colors.
Once the painting was completed I attached the tracks. To my shame I must
admit I only used a spare set of vinyl tracks from a Tamiya kit, instead
of the very good single tracks from the kit (I will change this - promised).
The tracks were primed with a mixture of two rust and two gun metal tones
from Humbrol, then they were sprayed Modelmaster's gun metal.
With the tracks attached, I sprayed a layer of dust to the running gear
and lower hull, using a mixture of Tamiya Buff and Flat Earth (50:50).
Finished!
| Final words |
The model
convinces all the way. The price is good, compared to Tamiya Tigers, the
quality is above the average (in my eyes better than DML!), details and
fitting leave almost no wishes.
Surely there are some weak points, but let's be honest - had this been
a kit from Italeri, DML or even Revell, I would have never mentioned them,
as the don't have any wheight due the overall lesser quality. Building
this Tiger was simply fun!
The very good instruction booklet with it's large format overview drawings
leaves no questions (okay, besides my freinds - the fueltanks...), therefore
the Academy Tiger with interior should also be build be beginners without
any problems.
The Academy Tiger wins our Gold Award. One could almost say "only", as without the problems with the turret, it might have been our first platinum award ever! maybe Academy secures one of them with their latest kits...
Let's put this whole review into one sentence: if you don't buy this kit - no one can help you!
| Price/value: | ***** | Parts fit : | ***** |
| Details: | ***** | Skill: | ***** |
|
Recommended reading:
|
© 2/2002
Carsten Gurk
