|
|
|
Deutsch verfügbar |
 |
| The original |
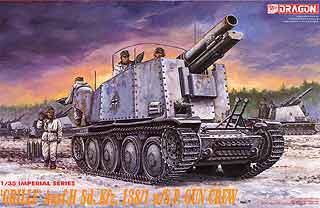
The first time speaking of the possibility to mount the 15cm sIG33 on Panzer 38(t) was a meeting on 6th March 1942. After one year of development the production began in February 1943, where the hull remained unchanged in the layout and a big superstructure was put onto it for protection of crew and gun. The whole vehicle weighted about 10.8 metric tons and had a maximum speed of 47kph.
The vehicles were produced at BMM, overall one Prototype and 209 production vehicles. There were delivered to 1., 2., 4., 5., 16., 17., 24. and 26.Panzerdivision, as well as 3. und 29. Panzergrenadierdivision, the Panzergrenadierdivisionen "Großdeutschland" and "Feldherrenhalle" and 1., 2. und 3. SS-Panzerdivision. These were mainly used on the Easten Front.
| Der Bausatz |
A variant of the Panzer 38(t) from Dragon is some kind of rare and was some kind of expensive when it was new (over 45,-Euro). I think it has gone out of production and I saw it several times for about 30-35,-Euro.
Looking into the box proposes a great kit ... lots of parts and a crew-set of four men and ammo. All in all there are six runners plus four runners for the good single track links. Additional some PE-parts which are from very thick metal. The plastic parts are all in nice quality and good detailed. Especially the bolts of the hull, superstructure and wheels are well done.
The instruction is quite extensive, but partly a bit too complex. Even the fact that some runners got no character increases the difficulties because on one hand you have to look on which runner the desired part is, on the other hand you can get the incorrect part because of double use of numbers.
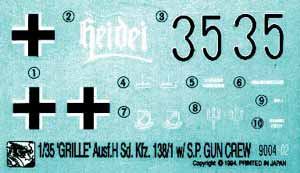
The enclosed decalsheet is very Spartan, it only makes one variant with the divisional sign of the 2nd Panzerdivision, which was used in 1944 in Normany and the Ardennes.

| Der Bau |
 The construction begins very easy because the hull is relatively complete, so you can begin with the suspensions and wheel mountings, which is all made to stay movable, exept for the wheels themselves. Here is the first time you have to watch out to use the correct wheels. The wheels with less rivets would be movable, but are not correct for this SPG.
Because of the movable suspension system I decided to use the ATL-13 Friulmodel single track links instead of the plastic single track links that come with the kit, so the suspension/track system can fit to uneven ground.
In the next step the side walls of the hull need to be shortened by 4.5mm which os no problem at all if you use a sharp knife to mark the cut and saw with a thin blade. Some sanding an thats it!
Next item is the interior with cardan shaft tunnel and engine compartment wall. Then you can paint the whole interior with a bit darkened white and glue the gear unit and drivers seat into position. The interior is so some kind of rudimentary but accepable. The engine deck made some problems as it didn't fit perfect to engine compartment wall and rear hull. The box and plate on the right hand side of the engine deck are a bit confusing as it is not clear visible how they need to be attached. The big box in the middle is correct fitted when standing a bit inclined and two of the bigger pins of the plate need to be removed to fit in the holes.
 The superstructure side plates get some interior details in the next step. Here it is useful to see some original photos ... part MA9 is somewhat too short or made to sit in a wrong postion. Here we bend for the first time PE-Material for the radioset. The metal is thick and hard to bend. The ammunition holders, made from parts D24 and D25, are a bit problematic as D24 is so wide for a complete reounding of one ammo-holder, which means that the double ammo-holder has no more space in the middle for the other rounding D24.
 The parts of the superstructure, the doors (A3, A9) and the glacisplate (31) should be raised and glued together very quic in one step so you can be sure everything fits, while it's still ridiculous to me how all these parts should fit in the desired places, because in the front end of the superstructure it is so wide that the side walls can be glued left and right to the hull sides, while in the back it only fits (just because of the doors) ONTO the hull side walls! Here it is even better to look at original photos to understand the placement of the superstructure.
The whole vehicle and superstructure interior can be painted sand-yellow (if you wanna build one of the very first production vehicles you can use medium grey).
 The 15cm sIG 33 from the kit looks good so far, but I had a Jordi-Rubio barrel at hand and wanted to use it. Because the metal barrel was much heavier than the plasctic one from the kit, I need to fix it which is not so bad at all, cause the flap which normally moves with the elevation is also not movable in this kit.
 A bit more tricky to construct is the gun travel lock on the glacis plate. The PE parts are so small and thick, they're nearly impossible to bend correct as well as the postioning is very unclear. Also parts 85 and 86 wouldn't really fit!
The last steps make some smaller parts as holding bars for the canvas and tools where it is needful to look at original pics, where I fitted spare track links, a spade and a pickaxe on the mudguards. The bows (A32) at the top of the superstructure sides are too rough ... here a PE-set would be fine ... so I cut them a bit in their length so they are not that big and look over-dimensionated.
At the end I put the Friulmodel track with drive sprockets on the kit, where you should look with a piece of track for the correct width of the the both tooth discs when glueing the drive sprocket together.
| Bemalung/Alterung |
 My Grille was attached to th Panzerdivision in the Winter '44/45 on the Eastern Front. Therfor I painted it sandyellow with Revell colors. The markings shown in the instructions are a bit faulty as it shows a vehicle of the 2nd Panzerdivision in whitewash from the Eastern Front, while the 2nd Panzerdivion was at that time in Normady and Ardennes. For the markings for that 2nd Panzerdivision would be a sandyellow with very sharp edged brown splodges correct.
 My vehicle got the tactical marking of heavy self propelled infanterygun and the marking of the 4th Panzerdivision and some additional 'Balkenkreuze'. Over that I painted the whole vehicle in a thin and hasty applied white wash made of opaque white thinned a bit with water, which I rubbed of later on edges and corners. Especially the roadwheels were rubbed of of the white wash to make a used look.
After that I made a washing of the whole with darc acrylics mixed in spirit, to set off deepenings. The bows (for fastening the canvas) got some traces of rusty water running down the superstructure.
The track was painted in very dark metallic paint, then a fast paintover with rust/metal-color and at least I sanded areas to have original metal shining through to simulate fresh grinded-off metal.
At last the running gear an lower parts of the hull were dusted with light brown/yellow pastel-chalks.
The Crew-figures were painted as shown in instruction simple white, while the faces got a flesh color mixed from several Revell-colors. The faces of the figures are not so detailed to make a very good face, but that is ok and was finished with a light washing!
| Fazit |
An extensive kit with loads of nicely detailed parts, good single track link, suitable crew figures, ammunition, useful interior and especially the wonderful movable suspension system. All this makes the kist a bit pricey which shocks when looking at the dimensions of the tank!
Negative points of this kit are the little confusing and bit inaccurate instructions, the "not-really-good-fitting" superstructure parts and the meagre decal sheet.
But all in all it builds into a nice and decent vehicle which can be made better by the Friulmodel tracks and Eduard-PE-Set!
| Price / value: | ***** | Part's fit : | ***** |
| Detail: | ***** | Skill level: | ***** |
 |
 |
 |
 |
 |
 |
Used literature:


© 12/2001 Thomas Hartwig


