|
|
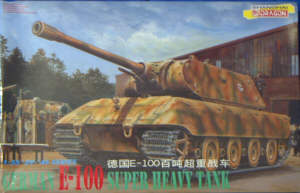 |
The Waffenamt ordered the E 100 from the Adlerwerke firm in 1943, as a parallel project to the Porsche 205 Maus. In 1944, after numerous reversals of fortune, Hitler decided to stop development work on all heavy tank projects, and as they were no longer top priority, only three workers were assigned for the assembly of the prototype, on the site belonging to Henschel, at Paderborn. The chassis was practically finished at the end of the conflict, only the turret was missing. For the first trials, a Tiger ll engine, HL230P30, had been installed as well as an Olvar transmission. The final version was to be equipped with a HL234 engine and a Mekydro suspension. The proposed armament was the 17cm KWK44 gun. Note that contrary to other series E projects, the E100 was fitted out in a very conventional way. The transmission was at the front; the Belleville-Washer suspension was externally mounted. The armoured skirts and the combat tracks could be dismantled in order to reduce the width of the vehicle to 3.29 m for transport by rail. The finished chassis was found on the test site at Haustenbeck, near Paderborn, and was taken away for evaluation.
| The model |

Produced by Dragon, this model is the biggest armoured German vehicle that I know of, even compared to the Maus which is quite imposing in 35th scale. The general quality of the kit is up to Dragon's usual standard, we are used to their quality mouldings and impeccable fineness. Made up of a few less than 300 pieces, moulded in soft light-grey plastic, Dragon has really spoilt us with the set of separate tracks links, supplied in sections made up of 5 links, and the rest as individual links. The majority of the work is centred on the six pieces, which represent the turret, in one piece, the top hull, the bottom hull, the back and the two sides. The aeration grills on the engine deck are also included, in the form of a small-etched brass set. That's all I have to say on the kit itself.
| The assembly |
 The
construction will be very simple, thanks to the dimensions of this monster
vehicle and the size of the parts. Assembly begins, as usual, with the
hull, which is assembled in a few minutes, after careful cleaning of all
the pieces, of course. I would advise you to assemble the sides first
of all, then the back panel and the bottom hull before fixing the top
hull. Doing things in this order will prevent gaps from appearing between
the parts. The whole thing needs to be left to dry for a few hours, leaving
time to prepare the wheels and the various chassis components. Assembly
of this will be very simple as well, as Dragon has moulded most of the
parts in one piece. Any remaining traces of moulding should very carefully
be removed from the wheels. You can now fix all these elements. Only the
front-drive sprocket should be left loose, in order to allow easy assembly
of the tracks. As far as the tracks are concerned, the notice has the
best solution in my opinion. The bottom part should be assembled first,
then the front part around the front drive sprocket, followed by the back
part and then finally fill in with the top part. This allows you to get
a magnificent sagging effect (an expression used to describe the bending
in the tracks on their wheels due to their mass). Note that you will have
a few links left over, which may come in very handy if you have any problems.
The
construction will be very simple, thanks to the dimensions of this monster
vehicle and the size of the parts. Assembly begins, as usual, with the
hull, which is assembled in a few minutes, after careful cleaning of all
the pieces, of course. I would advise you to assemble the sides first
of all, then the back panel and the bottom hull before fixing the top
hull. Doing things in this order will prevent gaps from appearing between
the parts. The whole thing needs to be left to dry for a few hours, leaving
time to prepare the wheels and the various chassis components. Assembly
of this will be very simple as well, as Dragon has moulded most of the
parts in one piece. Any remaining traces of moulding should very carefully
be removed from the wheels. You can now fix all these elements. Only the
front-drive sprocket should be left loose, in order to allow easy assembly
of the tracks. As far as the tracks are concerned, the notice has the
best solution in my opinion. The bottom part should be assembled first,
then the front part around the front drive sprocket, followed by the back
part and then finally fill in with the top part. This allows you to get
a magnificent sagging effect (an expression used to describe the bending
in the tracks on their wheels due to their mass). Note that you will have
a few links left over, which may come in very handy if you have any problems.
 Two
handles should be added to the hull hatches, these handles have been forgotten
by Dragon but are perfectly visible on wartime photos. The pieces on the
front glacis plate are definitively positioned. This is a very quick operation.
The towing shackles can then be glued as well, but this isn't compulsory.
Once this stage has been finished, all that remains is to place the various
parts, which make up the engine deck, those that line the turret and the
assembly of the gun. Two versions are supplied: a long gun and a short
one. In our case, it is the shorter version, which interests us. It is
in five parts, two for the tube, two for the muzzle brake and an etched
brass part representing the openings for this. Assemble the tube first
of all. There is no need to replace it with an aftermarket part; you just
need to take your time during assembly. Spread just a little bit of liquid
glue on the joint, press hard until you get a perfect joint. After drying,
delicately sand in a circular motion around the tube and not vertically
up and down. You will thus create a perfect joint. For the etched brass
part, spread super-glue all around the muzzle brake and apply the piece
that you will previously have fashioned around a paintbrush. Personally,
I would shorten this piece by 1mm, because it seems slightly too long
to me. Then, after complete drying, and of course for those who are interested,
I drilled the holes again, one by one, which makes it considerably more
realistic. The gun is then fixed on the turret following Dragon's instructions.
Two
handles should be added to the hull hatches, these handles have been forgotten
by Dragon but are perfectly visible on wartime photos. The pieces on the
front glacis plate are definitively positioned. This is a very quick operation.
The towing shackles can then be glued as well, but this isn't compulsory.
Once this stage has been finished, all that remains is to place the various
parts, which make up the engine deck, those that line the turret and the
assembly of the gun. Two versions are supplied: a long gun and a short
one. In our case, it is the shorter version, which interests us. It is
in five parts, two for the tube, two for the muzzle brake and an etched
brass part representing the openings for this. Assemble the tube first
of all. There is no need to replace it with an aftermarket part; you just
need to take your time during assembly. Spread just a little bit of liquid
glue on the joint, press hard until you get a perfect joint. After drying,
delicately sand in a circular motion around the tube and not vertically
up and down. You will thus create a perfect joint. For the etched brass
part, spread super-glue all around the muzzle brake and apply the piece
that you will previously have fashioned around a paintbrush. Personally,
I would shorten this piece by 1mm, because it seems slightly too long
to me. Then, after complete drying, and of course for those who are interested,
I drilled the holes again, one by one, which makes it considerably more
realistic. The gun is then fixed on the turret following Dragon's instructions.
 Before
going any further, add a piece of plastic to the front of the hull. In
fact, on available archive photos of this vehicle, we can clearly see
that the front of the hull has a line of holes, used to fix the armoured
skirts. These pieces are cut from thin plasticard and put in place. Another
important point is that the sidewalls and the welding seams are, for this
scale of model, a bit too smooth for my taste. I began by reworking the
welding seams with a new scalpel blade. I simply started engraving, in
the same direction, all the visible welding seams on the front, the sides
etc
. The other task is to rework the general surface of the kit with
a dental burr mounted on a mini drill. Adjust the speed, not too quick
or you will cause the plastic to melt, and let the burr wander principally
over the vertical surfaces of the turret. The aim is not to reproduce
a roughcast effect, but rather to show the small imperfections of these
large plates, which were cast in one piece. Try to obtain a uniform effect
and not one where certain areas are more marked than others. The rear
and front of the turret will be subjected to the same treatment. The traces
of assembly of the turret panels, which show up as hollowed roundels,
are also reworked with an adequate drill bit. For more precision, I didn't
use my mini drill, but I did it manually, allowing better control of the
pressure on the plastic.
Before
going any further, add a piece of plastic to the front of the hull. In
fact, on available archive photos of this vehicle, we can clearly see
that the front of the hull has a line of holes, used to fix the armoured
skirts. These pieces are cut from thin plasticard and put in place. Another
important point is that the sidewalls and the welding seams are, for this
scale of model, a bit too smooth for my taste. I began by reworking the
welding seams with a new scalpel blade. I simply started engraving, in
the same direction, all the visible welding seams on the front, the sides
etc
. The other task is to rework the general surface of the kit with
a dental burr mounted on a mini drill. Adjust the speed, not too quick
or you will cause the plastic to melt, and let the burr wander principally
over the vertical surfaces of the turret. The aim is not to reproduce
a roughcast effect, but rather to show the small imperfections of these
large plates, which were cast in one piece. Try to obtain a uniform effect
and not one where certain areas are more marked than others. The rear
and front of the turret will be subjected to the same treatment. The traces
of assembly of the turret panels, which show up as hollowed roundels,
are also reworked with an adequate drill bit. For more precision, I didn't
use my mini drill, but I did it manually, allowing better control of the
pressure on the plastic.
What's more,
when looking at wartime photos, several questions spring to mind, such
as: " what would this vehicle have looked like if it had been produced
?" Or, " How would it have been painted if it had been used in combat
?"Now that the kit is finished, this is the next point to be addressed
| Painting |
Which colour ???
Much has been written about the colours used by the German forces at the end of the conflict. By consulting the numerous references available, anything, or nearly anything, was possible, as long as certain rules were observed. At the end of 1945, faced with a flagrant shortage of raw materials, certain rumours report a return to panzer grey, this being partly due to the large stock of grey available caused by colour changes in 1943. But this hypothesis is not confirmed. What's more, some vehicles were used with the red anti-rust primer directly applied in the factory. Some vehicles even had camouflage over this primer. Others were seen with more or less strange camouflage schemes, such as those that can be seen in certain publications, showing new up-to-date archives. It seems that Jagdpanthers or even Panzer lV's were seen with flamboyant purple shades. Therefore, we can imagine all sorts of things. I decided to paint my E100 with washed green camouflage, sporting some large yellow stripes, on which some green dots were applied. These camouflage schemes were spotted on Tiger II of the s. SS.pz.abt.511, in May 1945. From this information, we can easily imagine that this E 100 could have been painted in a similar fashion.

Painting the beast...
The base coat for this camouflage is the humbrol green H159 kaki drab, heavily mixed with white paint in a 3 to 1 ratio. When fully dry, the yellow is applied on top. The yellow is the usual reference use, the H 93 or H94. It 's just a matter of choice, as the filters and washes will change the final result. Then came the highlights. Using the base coats, I started to highlight all the flat surfaces on the model, which means nearly everywhere except on the engine deck. The green dots are painted using a template cut into a piece of masking tape with a hole punch. The yellow spot in the centre is hand painted.
The model is
left aside for another 48 hours. This is what I usually say, but it all
depends on the conditions of drying. If you use acrylic paints, you will
encounter drying time, and work sessions will be more frequent.
Following Miguel Jimenez technique, I applied a series of filters on the
model. Filters on the contrary of washes are intended to bring chromatic
shades to the base coat. Washes are used to give an impression of depth
and contrast. Filters require heavy thinned paint, 10 % paint, 90% white
spirit. The filters is applied with large flat brush and set aside to
dry. Many filters can be applied depending the effect you wish to give
to your model. For this one, I used some dark green paint and another
with dark brown. It only at this stage that the work carried out on the
surfaces is revealed as we can see the marks left by the dental burr.
I used the H29 dark brown reference for the substructure.

The wheels
are then repainted using a fine nozzle in the airbrush, but just in the
middle using the same green as for the base coat. Later when the paint
will be dry, a heavy dark brown wash will be applied in all the nooks
and crannies. For this I used oil paints, ranging from burnt sienna to
black. These washes are applied using a 000 paint brush.
The weld seams are reworked with dark brown pastels, which were thinned
with white spirit and applied with a fine pointed brush. I find this way
of working far more attractive and also in my opinion, it gives better
results. The various traces around the turret and on the front glacis
plate are made using this method. The mud on the hull side is first of
all painted with dark brown, using several shades, in order to give more
depth. Then it is reworked with dark, light brown, orange and sand colour
pastels. All these colours were mixed in a plastic food container, ask
your wife for this!!!
Pastels are fixed to the model like normal paint. The front part will
be more orange as to simulate rust, which is mixed with the accumulated
mud. Dry mud is hand painted using Humbrol H121. Some drybrushes were
applied here and there, but remained light.
The engine deck is darkened with dark pastels chalks. The same goes on
the machine gun portholes as well as the rear turret door. It is a nice
way to enhance them on the green background.
Tracks were previously with a brown mixture, which was followed by an
application of rust colour pastels. This operation was repeated until
the desired effect was achieved. In some places the mix of pastels was
lighter as to simulate the different shades of colours rust can have.
The inside of the tracks were also treated this way, but with lighter
shades. Only the wheel-rolling band remained darker.

All the recessed areas on the wheels received a dark wash of brown pastels thinned with spirits. Drying time takes between 15 to 20 minutes, and you can see the thinners evaporating, leaving only the pastel powders. It is only at this moment, that the pastel gets its dusty appearance. Tracks are then drybrush with some oil black paint.
The only things
left to paint were the markings and the Balkan crosses. I did not use
any divisional symbols, as German panzers did not carry any at this stage
of the war. I used the Stencillit products. The white colour is mixed
with a bit of yellow to tone it down. I did not wanted them to be too
flashy on the camouflage. The exhaust stacks were also treated with wet
pastels, using colours ranging from orange to black. The vision blocks
were then painted with gloss black and the model was finished.
| Conclusion |
I must admit that I particularly enjoyed building and decorating this model. It is a nice addition to my collection but slightly too big next to my Tigers and panthers.
| Price/value: | ***** | Fitting: | ***** |
| Details: | ***** | Skill: | ***** |


(C) 2/2002 Fabien Descamps